
Configuring your WordPress website to integrate with your CDN provider is a straightforward process. WordPress offers a variety of plugins that can simplify this task. In this article, we will explore some of the best plugin solutions for this purpose.
Table of Contents
1. CDN Enabler
2. ShortPixel Adaptive Images
3. W3 Total Cache
4. WP Rocket
5. Frequently Asked Questions
Before we proceed, it's essential to note that the steps and options may vary depending on the CDN provider you are using and any additional settings or configurations they require. Always refer to the official documentation or support resources provided by your CDN provider for accurate and up-to-date instructions.
CDN Enabler
CDN Enabler is a popular method for integrating a Content Delivery Network (CDN) with your WordPress website. It enables the rewriting of URLs, such as those for CSS, JavaScript, and images, so that your website can efficiently serve these assets through a CDN.
To connect a CDN service to your WordPress website using the CDN Enabler plugin, follow these steps:
Please Note: Ensure that you have already registered an account with a CDN provider and obtained the CDN URLs. These URLs typically start with "http://" or "https://".
1. Install and activate the CDN Enabler plugin from the official WordPress plugin repository.
2. Within your WordPress admin dashboard, navigate to Settings > CDN Enabler.
3. Copy the Edge Address from your StackPath Control Panel or your CDN provider's dashboard.
4. Return to the WordPress CDN Enabler settings page and paste the Edge Address into the field labeled CDN URL.
By following these steps, you'll successfully integrate a CDN with your WordPress website, enhancing its performance and optimizing content delivery.

Certainly, here's the updated text:
1. Insert the CDN URL: Copy the CDN URL provided by your CDN provider and paste it into the "CDN URL" field within the CDN Enabler settings.
2. Save Your Settings: After pasting the CDN URL, make sure to save your settings to apply the changes.
3. Clear WordPress Cache (if applicable): To ensure that the updated URLs take effect, consider clearing your WordPress cache. This step may vary depending on your caching plugin or configuration.
4. Verify Integration: Confirm the successful integration by inspecting your website's page source. Follow these steps:
- Right-click on your webpage.
- Select "Inspect Element" or "Inspect" from the context menu.
- Choose the "Source" tab within the developer tools.
- Look for the presence of the CDN URL in the source code. Its presence indicates that assets are being loaded from the CDN, confirming the successful integration.
This process ensures that your website is effectively utilizing the content delivery network (CDN) for asset delivery.
ShortPixel Adaptive Images
To set up a Content Delivery Network (CDN) using the ShortPixel Adaptive Images Plugin in WordPress, follow these steps:
1. Install and Activate the ShortPixel Plugin: Start by installing the ShortPixel Plugin in your WordPress dashboard. Once installed, activate the plugin. To utilize the CDN feature within the ShortPixel Plugin, you'll need to obtain an API key from the ShortPixel website.
2. Obtain an API Key: Visit the ShortPixel website to acquire your API key.
3. Configure ShortPixel Plugin Settings In your WordPress dashboard, navigate to "Settings" and then select "ShortPixel." This will take you to the plugin's settings page.
4. Enter the API Key: On the ShortPixel settings page, locate the "API Key" field. Input the API key obtained in Step 2, and then click the "Save Changes" button to store the API key securely.
5. Enable CDN: After saving the API key, scroll down to the "Advanced" section on the ShortPixel settings page. Here, you will find the "Enable CDN" option. Check the box to enable the CDN feature.
6. Configure CDN URL: Once you enable the CDN option, additional settings will appear. Locate the "CDN URL" field and input the URL provided by ShortPixel for the CDN. If you are using the default ShortPixel CDN, the URL format will be: https://cdn.shortpixel.ai. If you have a custom CDN, enter the appropriate URL here.
7. Save Settings: To save your CDN settings, click the "Save Changes" button.
8. Verify CDN Functionality: To ensure that the CDN is functioning correctly, clear any caching plugins or server-side caches. Afterward, load your website and inspect the page source code to confirm that your CDN service is indeed serving your static assets.
By following these steps, you can effectively configure a CDN for your WordPress website using the ShortPixel Adaptive Images Plugin, enhancing your website's performance and optimizing the delivery of static assets.
W3 Total Cache
The W3 Total Cache plugin focuses on increasing website performance and reducing load times. One of its features is a content delivery network.
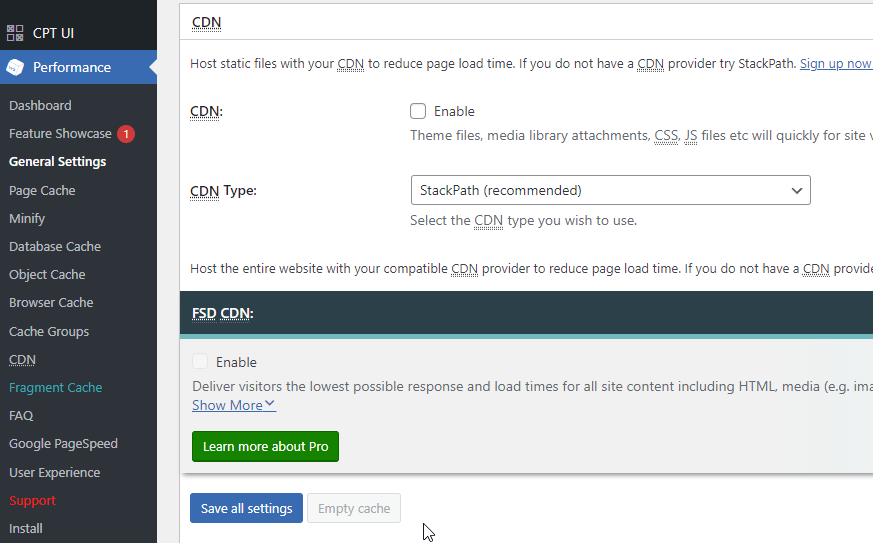
In the plugin’s admin settings “Performance” go to “General Settings”.
-
Enable Page Cache: Tick the checkbox next to "Page Cache" to activate it.
-
Enable Minify: Check the box labeled "Minify" to enable this feature.
-
Enable CDN: Select the CDN checkbox and choose our preferred provider from the dropdown list.
-
Save Settings: Don't forget to save all the settings after making these changes.
You will be prompted to authenticate with your CDN provider’s account and paste in the Client ID and Client Secret keys. Then you can “Save all Settings”, “Purge Caches” and finally test the integration to verify it is working.
WP Rocket
WP-Rocket is a premium caching plugin with built-in support for CDN integration. Install and activate the plugin, and you’ll find the CDN settings within the plugin options.
Here's an updated text for configuring a CDN with the WP Rocket plugin in WordPress:
Configuring the CDN Plugin:
Once you've successfully installed the CDN plugin, the next step is to configure it by providing the necessary CDN details in the plugin settings. Typically, this involves entering the CDN URL or hostname and any additional authentication details provided by your chosen CDN provider.
Here's a step-by-step guide to configuring a CDN with the WP Rocket plugin in WordPress:
1. Install WP Rocket: First, you can purchase WP Rocket from the [official website](https://example.com) and download the plugin. Then, access your WordPress admin dashboard, navigate to "Plugins" > "Add New," and upload the plugin file. Activate the plugin once the installation is complete.
2. Sign Up with a CDN Provider: Before configuring WP Rocket, you need to sign up with a CDN provider of your choice and obtain the necessary credentials. Some popular CDN providers that work seamlessly with WP Rocket include Cloudflare, MaxCDN, and KeyCDN. Follow your CDN provider's instructions to set up your account and obtain the CDN URL or hostname.
3. Configure WP Rocket for CDN Integration:
- In your WordPress admin dashboard, navigate to "Settings" > "WP Rocket."
- Click on the "CDN" tab within WP Rocket's settings.
- Enable the option labeled "Enable Content Delivery Network."
- Enter your CDN URL or hostname in the "CDN CNAME(s)" field. For instance, if you're using Cloudflare, input something like "cdn.yourdomain.com" or the CDN URL provided by Cloudflare.
- Save the settings to activate CDN integration.
4. Test CDN Integration: After configuring WP Rocket, it's crucial to ensure that CDN integration is functioning correctly. Load your website and inspect the page source code to confirm that static assets, such as images, CSS, and JavaScript files, are being served from the CDN URL. You can also use browser developer tools to check the network requests and verify that assets are being fetched from the CDN.
5. Clear Cache: Once you've configured the CDN, it's advisable to clear any cache generated by WP Rocket. Go to the "Dashboard" tab in WP Rocket settings and click on the "Clear Cache" button to ensure that your website serves the latest version through the CDN.
By following these steps, you can effectively configure WP Rocket to work in tandem with your chosen CDN provider, enhancing your website's performance and content delivery.
Frequently Asked Questions
How does a CDN work with WordPress?
Integrating a CDN with WordPress typically involves installing and configuring a CDN plugin specifically designed for WordPress. The CDN plugin is the bridge between your website and the CDN provider.
In the plugin’s settings, you specify the CDN URL or subdomain provided by your CDN provider, then the plugin rewrites the URLs of your static assets (images, CSS, and JavaScript), to point to the CDN. This integration ensures that when a user requests your site, the static content is served via the CDN’s servers, improving website performance by leveraging the CDN’s global infrastructure.
How do I link a CDN in WordPress?
To link a CDN in WordPress, you have to:
- Create an account on a CDN provider of your choice.
- Install and activate a CDN plugin on your WordPress site.
- Access the CDN plugin’s settings page in your WordPress dashboard.
- Enter the CDN URL or subdomain provided by your CDN provider and Save the settings to apply the CDN configuration.
The CDN plugin will automatically rewrite the URLs of your static assets to point to the CDN. Lastly, you have to test your site to ensure that the static assets are now being served via the CDN by inspecting the source code or using browser developer tools.
Does WordPress have a CDN?
As of the latest information available, WordPress does not come with an integrated Content Delivery Network (CDN) service. However, it remains fully compatible with a range of CDN providers, which you can seamlessly integrate by utilizing WordPress CDN plugins such as W3 Total Cache, WP Super Cache, or CDN Enabler. By setting up a CDN through these plugins, you can harness the CDN's robust infrastructure to efficiently deliver your website's static assets. This not only optimizes performance but also enhances the overall user experience for your visitors.


